Google has been active in the last year, introducing several algorithm updates, upgrading Google Business Profile (including removing the app entirely), and changing the way search results are presented. Businesses and local search markets should continue to expect the same things from the leading search engine in 2023.
As the local SEO and Google search ecosystems continue to evolve, it is essential to be aware of impending changes and implementations.
Table of Contents
ToggleIntroduction to jQuery in WordPress
The most widely used JavaScript library is jQuery. Due to the abundance of pre-made plugins it provides; front-end development can be greatly streamlined. You may simply add the plugin and fix any website issues without writing anything new.
It is also frequently used in WordPress to make the website’s front end simpler. Furthermore, WordPress already includes it by default. The additional functionality you require might not function after you install a new template for your website since WordPress is still using an outdated version of jQuery. In actuality, the solution to this issue is not that difficult. Just a few lines of code must be added to upgrade WordPress’ jQuery. Working with this library does have some intriguing quirks, though. So, let’s take a closer look at this query.
What is jQuery?
You should first review the fundamentals of JavaScript to properly grasp WordPress jQuery. It is one of the well-known languages frequently used to update, do calculations, and verify data on a website.
Additionally, HTML and CSS can be updated or changed with the aid of JavaScript. In other words, you are free to establish the rules and the content of your website. All of this is made feasible by the accessibility of numerous diverse script libraries.
One script library that is quick, compact, and feature-rich is jQuery. It is an open-source library that enables you to add or develop front-end features. For instance, you can tell jQuery is functioning if your websites display any dynamic functionality, such as a slider or rotation.
Why You Should Use WordPress jQuery?
There are several benefits to using WordPress and jQuery that you may not have considered. In addition to being used to provide engaging and dynamic features for your website, it can also lessen congestion on your meager bandwidth. All of this is made possible with jQuery, which enables you to execute any moving elements directly in the browser without having to reload the website.
Other justifications for utilizing a jQuery library in WordPress, aside from its ecosystem of plugins, include:
- Beginner-friendly nature- jQuery code is straightforward and short, making it simple to read and write.
- Compactness- because jQuery files are typically smaller than ordinary JavaScript files, you can do the same operations with less text.
- Compatibility across browsers- Popular browsers including Google Chrome, Microsoft Edge, Mozilla Firefox, Safari, and Opera all support jQuery.
- AJAX assistance- AJAX can be used by developers to create responsive and user-friendly websites.
- Reduced bandwidth use- Less bandwidth is used because jQuery can run animation effects directly on the user’s browser.
What is the “$ is Not a Function WordPress” Error?
WordPress by default is unable to recognize “$” as jQuery, which results in an error message reading “$ is not a function WordPress” appearing on your screen. In reality, it happens when the code begins to run immediately before the jQuery library.
Let’s use an example to better understand it. If a theme or plugin calls a code before contacting the appropriate jQuery library, an error will occur. Therefore, you must make specific adjustments, which we have described in the section below, in order to resolve this problem.
Note: As we have already cautioned you numerous times, if you plan to make specific changes to the WordPress core files. The first and most important step is to make a complete backup of your WordPress site as a precaution. It is so crucial that you risk completely wrecking your website if you accidentally leave off any character, not even a “;”.
Similar to this, you can also read our other in-depth posts, which cover all significant WordPress errors and their solutions in very thorough language, such as error 404, DNS probe finished nxdomain, 504 gateway error, etc.
How to Use jQuery in WordPress
Here are the two primary ways to incorporate jQuery into WordPress:
1. Adding jQuery Manually
If you’ve worked with WordPress development and JavaScript before, take these actions. Put your device on compatibility mode. It’s imperative to comprehend jQuery’s compatibility mode before you begin implementing your own jQuery scripts to WordPress.
The $ symbol is used by jQuery by default as a shortcut:
$(default) .ready (function () {
$(“button”). click (function () {
On your website, other JavaScript libraries, however, also use the dollar symbol as part of their syntax. Replace the $ symbol with jQuery to activate compatibility mode and prevent conflicts.
Take a look at the code below:
jQuery(document). ready (function () {
jQuery(“button”). click (function () {
The only issue with this method is that using jQuery rather than the shortcut requires adding additional characters, which results in bloated scripts. Select a new variable name to use in place of the dollar sign to resolve this problem. $j is the most typical one.
Just include the following code at the beginning of your jQuery scripts:
var $J = jQuery.noconflict()
Make a Script File
After that, create a custom script file with the .js extension-
- Access hPanel → Hosting → Manage
- On the left menu, select Files → File Manager.
- Enter public_html → wp-content.
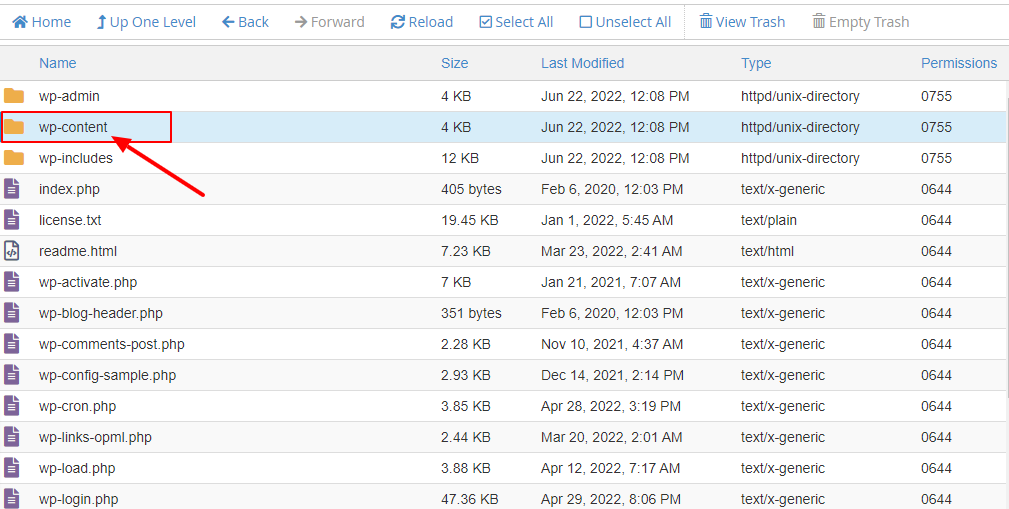
- Select one of the installed themes by opening the themes folder.
- Click New Folder on the left menu, then give the folder the name js.
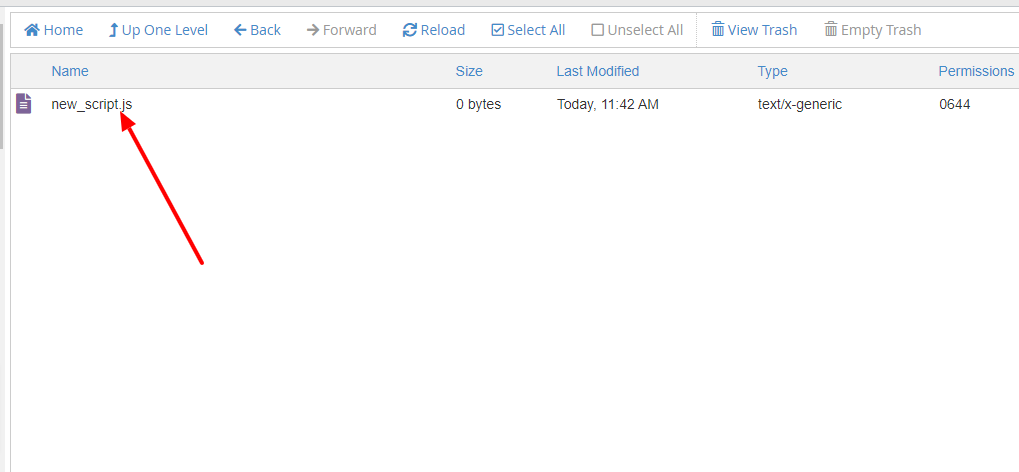
- To create a new.js file, select New File and type new script.js.
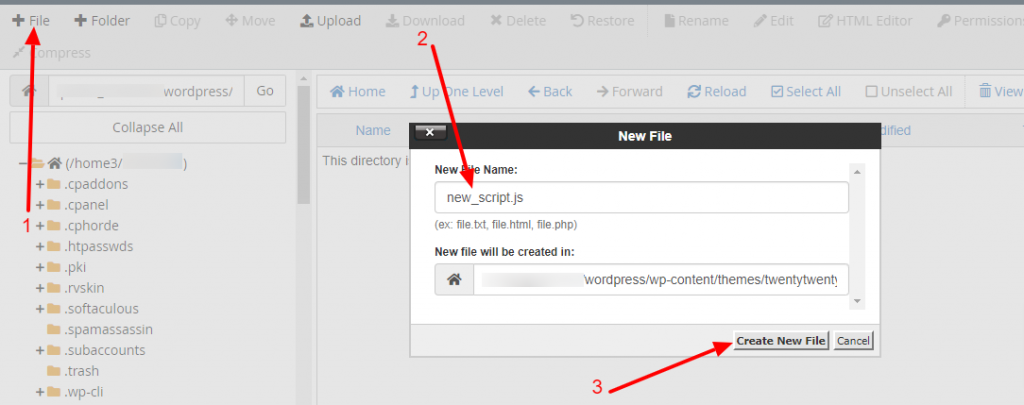
- jQuery scripts must be included in the file.
- To customize WordPress plugins, follow the same procedures again.
Fill out the functions.php file with the code.
The functions.php file can be found in the theme’s folder; identify it before adding inline scripts to WordPress.
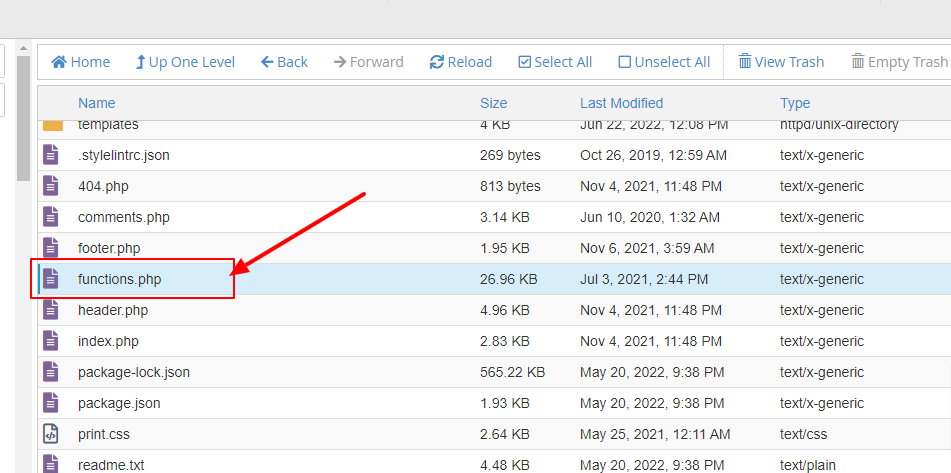
Open the file and add the jQuery function described below to the top:

Be careful you substitute the correct file names for new-script and new script.js. Users can add a custom script and let WordPress know that it needs jQuery by adding the wp enqueue script function to the PHP code. Additionally, it aids WordPress in finding the script file and modifying the theme using your jQuery scripts.
2. Using a Plugin
We advise utilizing WordPress jQuery plugins if manually adding scripts to WordPress is too technical for you:
Choose a plugin
WordPress provides a number of plugins that let you build interactive webpages using jQuery. The following are our best recommendations for various use cases:
- jQuery Updater: Although WordPress already has jQuery installed, it frequently makes use of an old version of the library. The JavaScript Library’s most recent version is always installed automatically on your website thanks to jQuery Updater.
- Advanced Custom Fields: You can add custom fields to posts and pages using this tool. Color Picker, Google Map, Date Picker, and Time Picker are a few of the jQuery-based fields it has.
- When users enter incorrect data on a Contact Form 7, you can display error warnings using the jQuery Validation for Contact Form 7 plugin. For URLs, dates, payment cards, and phone numbers, you can establish validation rules.
- With the help of the jQuery Post Splitter plugin, which works with the majority of WordPress themes, you may divide posts and pages into sliders.
Although installing these plugins streamlines the creation of websites, using them still requires a working knowledge of the JavaScript and jQuery libraries.
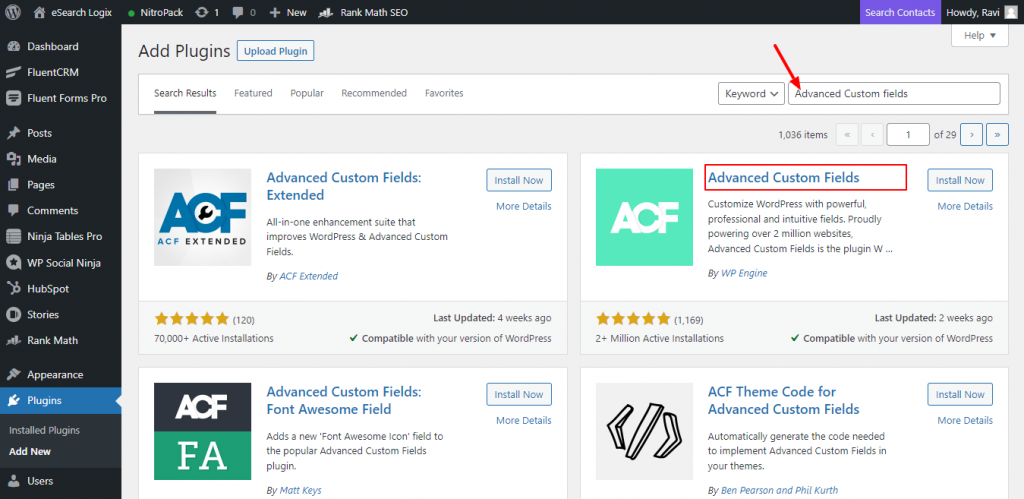
We will now utilize the Advanced Custom Fields plugin as an example of to use jQuery in WordPress.
Step 1: Go to your WordPress Dashboard > Plugins > Add new > “Advanced Custom fields” > Install > Activate.
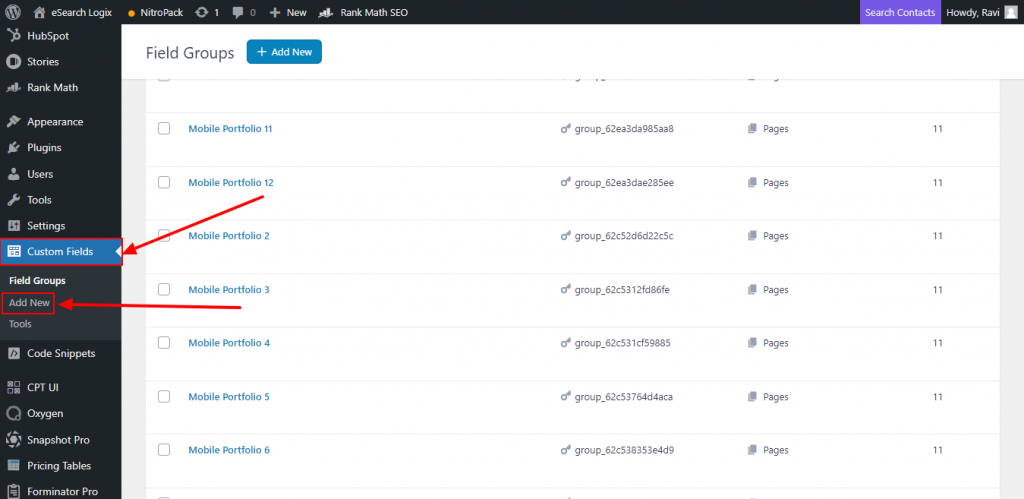
Step 2: You must modify the plugin’s settings in order to utilize it on your website after installing and activating it. To create your new custom fields, go to Custom Fields and click on Add New as displayed below:
Step 3: You now need to name your new field and label the field group before clicking the Add Field button.
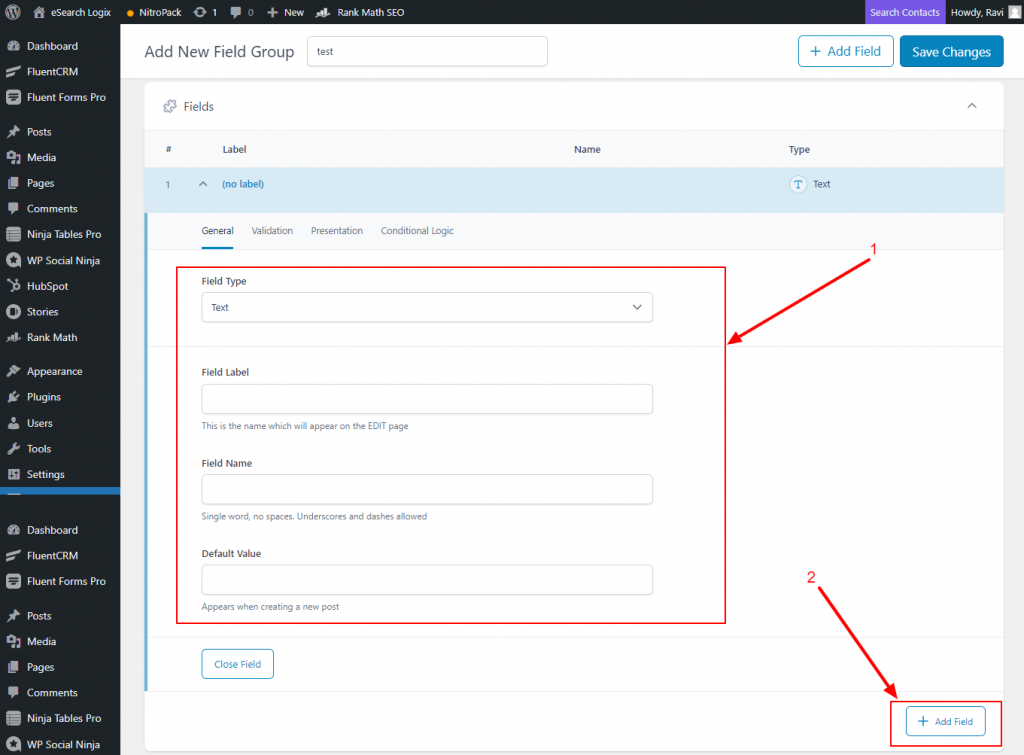
Similar to that, you can add other fields and complete the newly created form by naming the additional fields. You can drag and rearrange the fields as needed after filling out all the new fields. This implies that you have complete control over which edit pages the field will show up on.
Additionally, you will discover that based on the style of theme you used and the layout of your website, there are numerous possibilities from which to choose. Once you’ve completed all the settings, you can publish your changes, and your website will update as a result.
Conclusion
You now know what jQuery is, how to use it, and how to install it to a WordPress site using the most straightforward techniques. Before utilizing a plugin or doing it manually, we strongly advise you to learn everything there is to know about jQuery and how it integrates with WordPress in order to learn more about these particular libraries.
For any website owners and developers, understanding how to use jQuery in WordPress is essential. A quick and easy way to alter pages, add interactive components, and change the overall appearance of a WordPress website is to use jQuery. Change the compatibility mode, make a script file, and edit the functions.php file in the theme’s folder to manually add jQuery scripts. WordPress jQuery plugins like Advanced Custom Fields will facilitate the process for beginners.


